
Tricefy Connectivity User Guide: Philips HD11 Ultrasound System
The purpose of this user guide is to provide instruction to enable the connection of the Philips HD11 ultrasound system to Tricefy via an external uplink which is configured in the Ultrasound system DICOM settings. These instructions are to be used after the user has obtained the necessary connectivity information (IP address and port number) from the computer that will be used to host the external Tricefy Uplink. After reading the instructions contained within this guide, the user will be able to:
- Enter the Tricefy uplink connectivity information into the Philips HD11 ultrasound system.
2. Configure the programmable print keys on the Philips HD 11 ultrasound system to send images or cine clips to Tricefy via an external uplink.
3. Program the Acquisition/Capture Keys to send to Tricefy
Section 1: Entering the Tricefy DICOM storage information onto the Philips ultrasound system.
Access to the Philips ultrasound system DICOM Setup is through the Set Up hard key. The DICOM information can be accessed through the following keystrokes: Set Up>System> DICOM settings.
Note: The machine cannot be in Exam Mode during configuration.
1. Press the Set up hard key located on the left-hand side of the console located next to the probe and patient hard keys.

2.Highight the System tab, followed by the DICOM tab.

3.Once the DICOM menu opens, select the Preset rename, create, delete tab on the right-hand side of the screen.

4. In the Type a name for the new preset: field, enter: TRICE MEDICAL

5. Then press “Create New”
6. Select Close. Confirm TRICE MEDICAL appears in the Change DICOM Preset box. If not, choose this option from the dropdown menu.
7. Select change settings for current preset.
8. Now select the right-side tab: Servers and Roles

9. Now start with the left-hand side under the Servers column and select Modify.

- Enter the name.
- AE Title: archive
- IP Address: As obtained by the Tricefy Uplink host computer.
- Port number: 104 as obtained by the Tricefy Uplink host computer. Port 105 can be used if 104 is already in use.
10. To confirm proper DICOM service configuration, click on the Ping button.
11. Once the configuration has been checked, select “Done”.
12. Now under Roles column, select Modify.

13. Under Storage> Primary storage SCP, select Trice Medical in the drop down.
14.Click Advanced

15. On the Network Preferences tab:
-Select the Image Format tab
-Under Color Images>Format, select RGB
-Under B&W Images, select Use MONOCHROME2 Format
-Under Transfer Syntax, select Uncompressed, Implicit VR Little Endian
-Click OK
- Select Done and Close under the Roles section
- Click Modify Current when the DICOM Preset Settings Changed dialog box appears, followed by OK
Click Close, followed by OK to close the Setup screen.
If adding a second DICOM store for patient sharing, Repeat the above steps to create the second archive:
- In Step 4, enter TRICE PATIENT instead of TRICE MEDICAL
- In Step 9, enter the AE Title “patient"
Section 2: Programming the Print keys on the Philips Ultrasound system
Accessing the print key configuration is done through the Setup hard key on the left-hand side of the console located next to the probe and patient hard keys. The print configuration can be accessed through the following keystrokes: Setup>Peripherals>Config Acquisition/Capture.
- Under the Archive/Printer tab select the key to be programmed. There is an option of 2 configurable print keys (Acquire 1 button, Acquire 2 button)
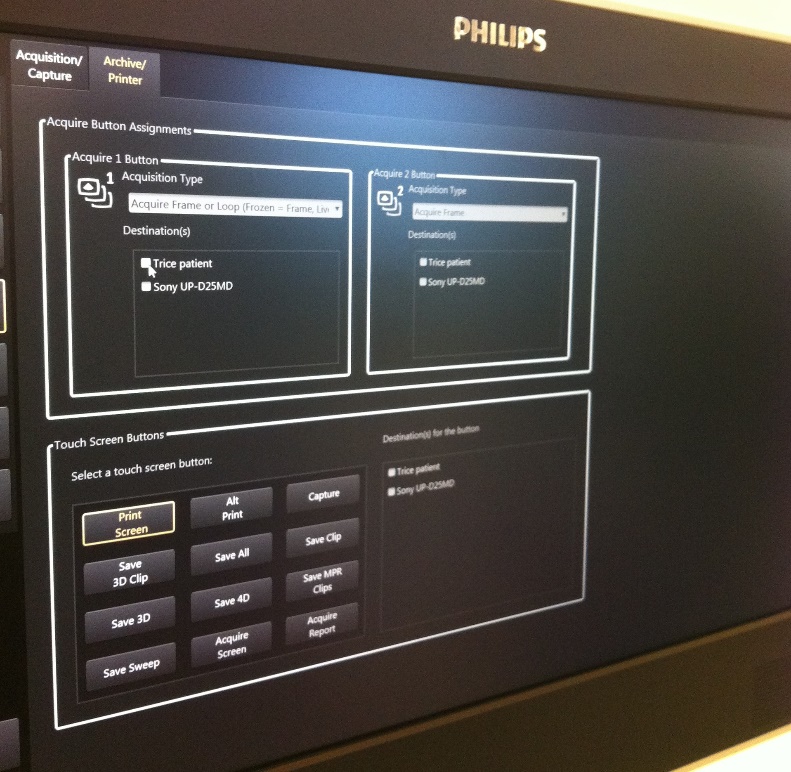

2.2 Use the drop down menu to select the Acquisition type (e.g. Frame, loop, or both) and select the destination ( archive or patient). Selecting a destination for the Acquire button will send the images or cine clips to Tricefy after each capture. See above image.
Congratulations! You have now configured the programmable print keys on the Philips ultrasound system.
Note: If the Acquire buttons are already in use, you can send exams to Tricefy using the following steps:
1) Perform the exam
2) Return to Review

3) Highlight or select only the images you want to send to Tricefy
4) Check Trice Medical and select the Send To button

 Copyright © 2016-2018 Trice Imaging, Inc. All rights reserved. 1343 Stratford Court
Del Mar, CA 92014
Copyright © 2016-2018 Trice Imaging, Inc. All rights reserved. 1343 Stratford Court
Del Mar, CA 92014